I have been on the on the lookout for a receiver to pair with my Nandi-40 transmitter. When I came across the SolderSmoke Direct-Conversion Receiver challenge, it seemed perfect. It checked all the right boxes: 40m band, fully analog, built entirely with discrete components, no ICs in sight. This project was originally intended for high-school students to build and learn about electronics and radio. This simple receiver has gained a following in the ham radio homebrewing community.
While browsing the project’s Discord channel, I “liked” one of the posts and Bill Meara (N2CQR) noticed it. If you’re not already familiar with Bill, he runs the popular SolderSmoke podcast and website. He emailed me and said I should also build the receiver! How could I say no?
Bill and I have known each other for a while. I first discovered his work through his book, Global Adventures in Wireless Electronics. If you appreciate the magic of radio and electronics, I would strongly recommend reading his book. The book is a memoir of Bill’s radio adventures, and it captures the thrill of the hobby. Bill has written about some of my projects on the SolderSmoke website.
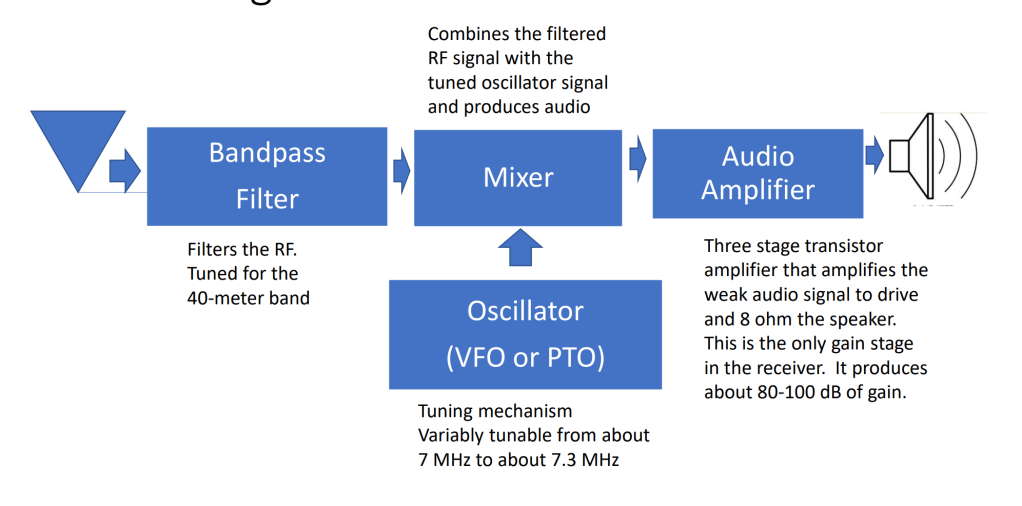
The receiver consists of four sections: a band-pass filter, an oscillator, a mixer, and an audio amp. Usually, folks build each module on a separate board. I like this approach to building because it is perfect for experimentation, even though it may not be the most compact. You can test and modify individual sections easily.
I started off by building the mixer, the heart of this receiver. It is a double-balanced diode ring mixer. Alan Wolke (W2AEW) has some excellent videos on this topic. To test the mixer, I fed signals from a signal generator into the RF and LO (Local Oscillator) ports and terminated the output with a 50-ohm load.
To verify that mixing was happening, I tuned a nearby shortwave radio to the difference frequency of the two input signals. When both signals were applied, the radio went quiet—proof that the mixer was generating a signal at the expected intermediate frequency. I also used the math function on my oscilloscope to view the mixing products and calculate the conversion loss. It was fun to see theory meet practice.


Next, I added the audio diplexer circuit which extracts the audio signal and terminates the unwanted higher-frequency components. Before moving on to the other modules, I wanted to verify that the mixer could actually receive a signal. I hooked up a signal generator to act as the VFO and borrowed an audio amplifier from another project for testing. And sure enough, it worked! I could hear signals coming through, which was a great moment of validation.
However, it quickly became clear that a band-pass filter was essential. Without it, the receiver was swamped with strong AM broadcast stations bleeding in from all over the band. Front-end filtering was necessary for selectivity.
I built the band-pass filter next. I didn’t have NP0 capacitors, so I used regular ceramic capacitors that I had in my junk box along with some trimmer capacitors. With a NanoVNA, I measured the insertion loss. It was on the high side at around -2.8 dB. Not ideal. However, I decided to continue on and revisit the band-pass filter later when I had better capacitors.

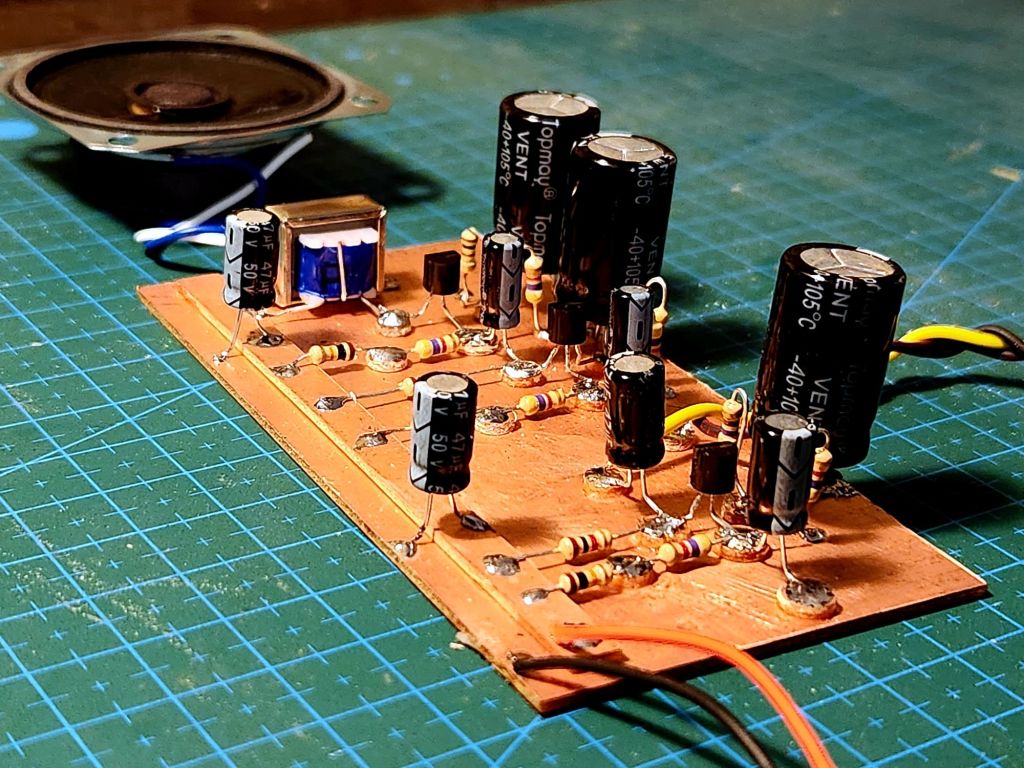
The audio amp is a straightforward 3-stage amplifier. The only part I didn’t have was the output transformer, which I was able to order online. The amp had a tendency to oscillate, but it works better with a stiffer 9V supply using two batteries in parallel.
Next, I built the VFO, which is a simple Colpitts oscillator with a JFET buffer stage. What’s interesting is that the oscillator uses an inductor for tuning. It is based on the design by Ashhar Farhan (VU2ESE) from his Daylight Again radio. The tuning coil is wound on a 3D-printed former. The original designed called for stable mica capacitors in the oscillator, but I couldn’t find them anywhere in Bangalore. I spent an entire afternoon navigating the crowded lanes of SP Road in search of these elusive capacitor with no luck. So, I built it with regular ceramic capacitors and hoped for the best. Needless to say, the oscillator drifted all over the place.
Eventually, I ordered surface-mount NP0 capacitors online. They were easily available, much cheaper than mica capacitors, but a pain to solder. After a few fumbled attempts, I somehow managed to solder them in place. The oscillator is now rock stable and hardly drifts at all.
I also swapped out the fixed capacitors in the band-pass filter with surface-mount NP0 capacitors and the insertion loss dropped down to about -0.4 dB. These capacitors were definitely worth the soldering hassle.
In the end, I hooked all the modules together and the receiver worked perfectly.

My first modification was an essential one: adding a power switch and a status LED. After that, I added a connector for an external speaker. It sounds amazing with an enclosed speaker. The connector auto-disconnects the internal speaker when an external one is plugged in, eliminating the need for a separate speaker selector switch.

Here is Bill’s writeup on my project. It is officially in the SolderSmoke Hall of Fame.
Here are some videos of the receiver in action:
SSB:
CW:

Excellent work, Ashish! This receiver should pair nicely with your Nandi-40 transmitter. I’m really looking forward to seeing how it all comes together as a complete transceiver!
Best 73 ~de Amrit VE7OSH
LikeLike